 |
|
Curved roadbed without plywood leftovers |
|
Roadbed for the BC&SJ
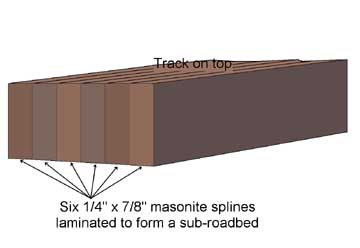
Construction of the second Bear Creek & South Jackson Railroad presented me with a construction issue. It would eventually contain over 4 1/2 scale miles of mainline track, some in towns but most is between towns. The route would wind and twist with grades of up to 2.7% as it worked its way up the Santiam pass. And this necessitates a lot of curved roadbed. Cookie-cutter plywood roadbedI used cookie cutter roadbed (3/4" plywood topped with cork) for the 4x8 BC&SJ roadbed. But cutting the many curved roadbed sections needed for the new layout from sheets of plywood would generate a lot of waste and take a lot of work. So I looked for roadbed alternatives. Spline roadbedSpline roadbed is made by taking several strips of fairly skinny material, standing them on edge, and laminating (gluing) them together to form a solid roadbed. There is little waste here. Another benefit is the beautifully flowing curves and easements the splines form when bent. Spline roadbed has been around for a while and many materials including wood, masonite, and homasote have been used all of which can give good results (while tearing down the Virginian & Ohio the work crew discovered that spline roadbed made from homosote strips nearly 40 years ago was still in good shape!). Masonite Spline Roadbed
I chose splines cut from 1/4" thick masonite because the
material is cheap and readily available (and maybe because I've been exposed
to a couple of examples of it including Joe Fugate's
Siskiyou Lines and
Lee Nicholas' Utah Colorado Western).
Some folks use "hollow" splines
where the strips are held apart by spacers. I followed Lee's and Joe's lead
and make solid roadbed for its extra strength. When it came time to build the third BC&SJ I again elected to use spline sub-roadbed between the town areas. In the towns I use plywood with cork roadbed because there are so many tracks. |
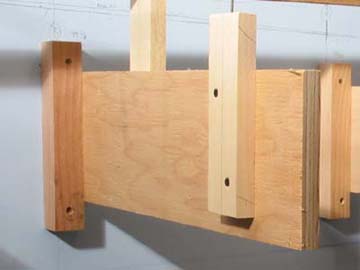
Screw the 2x2 cleat to the wall. Then glue and clamp the joist to the cleat.
Adjust the joists height and level it then screw it to the cleat. 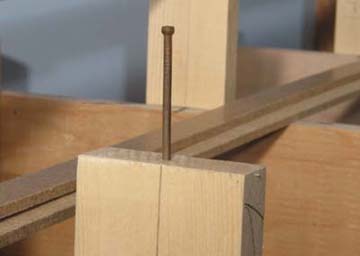
Nail installed in riser - note the center line drawn on the side of the riser. 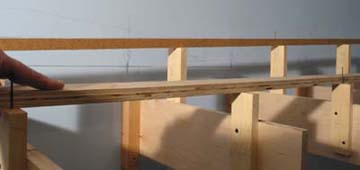
Using a straight edge to adjust a the height and position of a riser between two others. 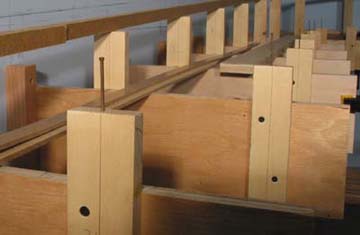
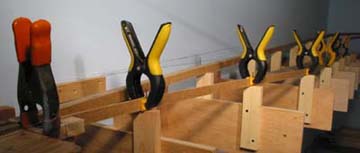
Risers with nails installed - ready to start attaching splines.
The splines will be installed on one side and clamped to the nails
to maintain alignment. 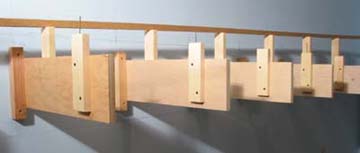
Another view of the risers. 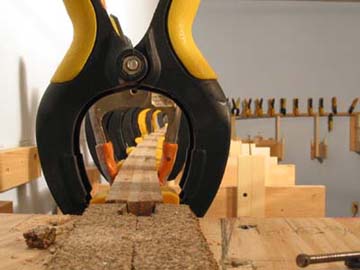
How many clamps does it take?. All of 'em! It's impossible to have too many clamps... 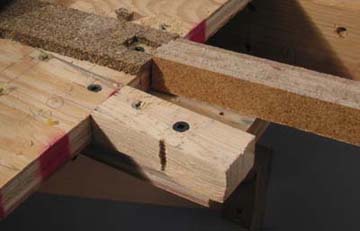
Guide block installed. Note the plywood shelf on which the splines
sit. The guide block is carefully lined up with the track centerline
on the adjacent Mill Bend plywood subroadbed. 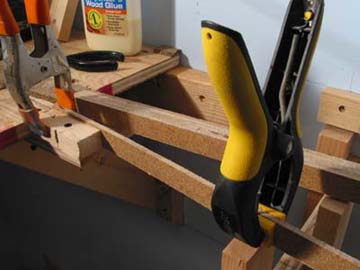
1st spline clamped to the guide block and center nails on the risers. |
How I Build Spline Roadbed
I start by building the benchwork to support the splines. For version 3 of the BC&SJ this was a series of plywood brackets/joists screwed to the wall. Dimensional lumber would also work for the brackets but the plywood was cheaper and wasn't going to warp on me. The brackets consist of a 2x2 screwed in place to the wall (it helps alot to have a track height line drawn on the wall to speed the riser installation). Once the bracket is plumb (vertical) I screw it to the wall using two 2 1/2" deck screws. I pre-cut the plywood joists to length and have them ready (I write numbers on the wall where each bracket goes and on the joists as I cut them out to avoid confusion). Back in the train room I apply yellow glue to the joists and clamp them to the cleats (which are already attached to the wall). I adjust the joistss height and get it level. Then I screw the joist to the cleat. Once the brackets are installed I layout the track centers drawing lines on top of the brackets. These lines will determine where the track risers go. I cut the risers from 1x2 or 1x3 cutting the tops at an angle to match the grade and clamp them in place temporarily while I use a level to get them vertical and check their height against the railhead (track) line drawn on the wall. I draw a vertical center line on each riser. When I install them I match this up with the track center line I drew on the brackets. If the riser if plumb (vertical) the track center will be at the top of the riser. I install a riser every few joists. Then use a straight edge to set the heights of the risers between them to speed things up. I double check the height and screw the riser to its bracket using two screws. DON'T use drywall screws here. They won't draw (clinch) the riser to the bracket. Use screws that don't have threads all the way to the heads (like a wood screw or a deck screw!). It is possible to pull the screws out to adjust things later but the less of this needed, the better so be careful with the riser alignments. Now I (carefully) drive a finishing nail in the top of the risers at the track center line. I'll use this later to clamp the splines in place. Lee Nicholas uses what he calls a "Darth Vader" hot glue gun to laminate his splines. With a 3 man crew (a gluer, a human clamp - with heavy gloves!, and a spline holder) it's possible to produce spline roadbed at a prodigious pace. I often work alone which makes the hot glue tricky, and I'm too cheap to spend a hundred bucks on an industrial strength hot glue gun, and I don't much like getting burned either. So I use yellow glue. This gives plenty of time to adjust the splines before the glue sets up. But it requires a lot of clamps. I found plastic spring clamps at Home Depot for $.98 each so I spent $40 and got a pile of 'em (my buddy Terry Roberts bought a bunch too so we pooled our clamps while doing splines). NOTE: Don't use white glue to laminate splines. It remains water soluable after drying and you don't even want your splines to delaminate when you get things wet glueing ballast and scenery in place! Lee reports that before hot glue he also used yellow glue but instead of spring clamps he wrapped the splines with packing tape. Each successive spline was laminated right over the previous layer's tape!. I've not tried this method. To start the process I needed to attach the first spline to the plywood sub-road bed in Mill Bend. Make a little shelf sticking out from under the plywood subroadbed. To this I screwed a piece of scrap wood aligned to the track center line for a clamping block/guide. AFter the first three splines are laminated I remove the guide. I'm really careful to keep from gluing this block in place. I finish running the first spline down the risers clamping it to their nails. Now I spread some yellow glue on one side of a spline and clamp it to the first one. Spread newspapers underneath if you care about glue drips on the floor or all those boxes of stuff under the layout. While the glue is still wet I adjust the heights of the two splines to make the top surface as even as I can manage. If the bottom surface is uneven it doesn't matter so much. NOTE: If there are any straight-aways clamp something stiff and straight to them to keep the splines from curving while the glue sets up. The straight edge should be used until at least 3 splines are laminated and the glue has set. I add splines until either I'm out of places to put them or out of clamps. Then I go do something else (like eat dinner). After an hour I come back, pull the clamps off and laminate up some more splines. Joe Fugate does it a little differently. He gets the first two splines glued up then he adds all the rest at once. This is faster than my method but he's got 4 lamination glue joints all trying to move at once so there's a greater chance to mess things up and have a sloppy upper spline surface. When half the full spline width is laminated and the glue is setup I pull the nails out of the tops of the risers and add the splines on the other side of the track center-line. When these are setup I run a screw through the splines (through the middle of a spline, not through a glue joint or they may delaminate!) into the riser. I stick a small level on top of the roadbed. If the side to side level isn't what I want it I unscrew the riser from the bracket and move it around until the sub-roadbed level is where I want it then rescrew the riser to the bracket. A surform plane will take the glue bubbles and gross imperfections (if any) off the top of the spline. After that I use a 16" long sanding block with 50 grit sand paper to smooth off the spline surface. I lay track directly on the splines top surface using paintable, latex, caulking compound to hold the track in place. Other folks glue cork down on top of the spline roadbed. Kelly Newton builds scenery over the splines at this point. He drapes cheese cloth over the layout then paints on 3 layers of plaster. WHen the plaster has set he does a quick sanding job on the sub-roadbed surface then glues down cork roadbed. You can learn more about this on the Allen Keller Great Model Railroad video of the Utah Colorado Western Railroad or by going to Lee Nicholas . Once the roadbed is ready for track you might want to put up some barricades. Sometimes the locals do dumb things on all that un-tracked sub-roadbed. Cheers! |
Another view of the 1st spline clamped in place. 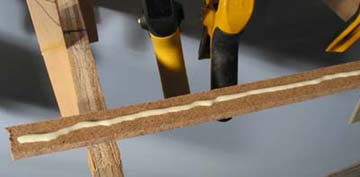
Put a glue bead on another spline. 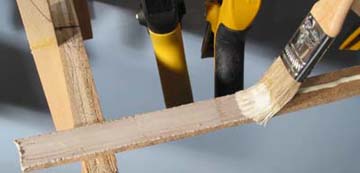
Use a cheap brush to spread the glue to make the coverage even.
It's better to have a bit too much than too little glue. 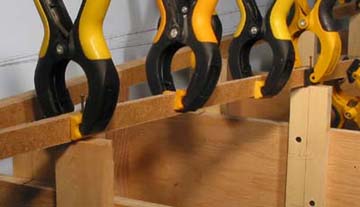
Clamp the 2nd spline to the first spline (on the same side of the nails as
the first spline). There will likely be glue drips so use a drop cloth or
some newspapers underneath to protect the floor (or what ever is down there). 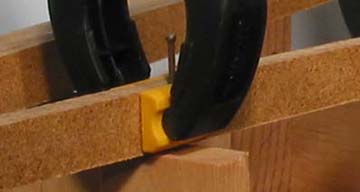
Second spline close up. Be sure to clamp a straight edge to the splines where there
will be straight track when laminating the splines. Otherwise your roadbed is likely
to be wavy instead of straight! 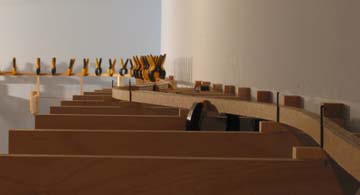
After three splines are laminated the roadbed will hold
its shape. Note how the roadbed flows around the curves. 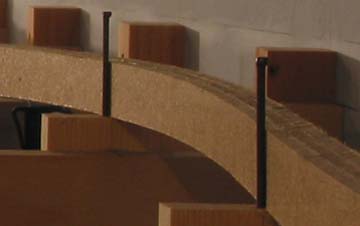
Three lamination close up. After this the nails can be pulled out
and the additional laminations attached on the other side of the
track center line. 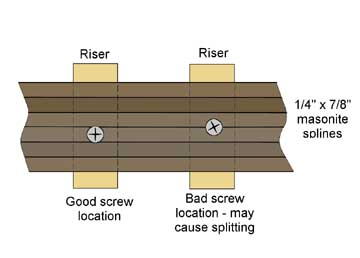
When all the splines are in place and the glue is dry (at least a
day) drill down through the top of the sub-roadbend and screw
the roadbed to the risers. When screwing the laminated masonite roadbed to the riser tops
don't put a screw between the laminations or they may split. Now you can unscrew the riser from the joist and twist the splines (if necessary to make them level) or change the roadbed height (to tweak the gradient if required). 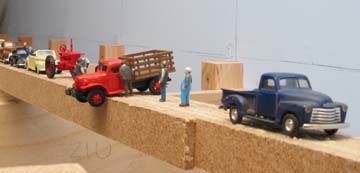
Some of the locals drove out on the sub-roadbed. One of them
had a little problem. Get your track laid quickly so this doesn't happen to you! |
My Results |